Retailers have the option to implement three different delivery configurations: KML file upload, flat rate fees, and postal code delivery zones. Whether you prefer a flat rate approach or wish to explore the flexibility of multiple delivery zones, all of these settings can be conveniently managed through the Greenline dashboard. In the following sections, we will guide you on how to effortlessly oversee your delivery options, rates, and zones from one centralized interface.
If you would like to offer delivery, please reach out to your Greenline Account Manager to enable delivery so you can customize your approach.
Configuring BLAZE ECOM on the Greenline Dashboard
- Log into your Greenline dashboard
- Go to BLAZE ECOM
- Click Configure on the right side of the page
- A side panel will open and you will see an option to Enable Delivery
- Turn ON the toggle for Enable Delivery
- Click Configure Delivery Settings

KML File Delivery Zones
The KML File Delivery Zones feature enables retailers to define delivery zones using KML files exported from Google My Maps. This feature offers a flexible and precise way to manage delivery areas by using geographic polygons.
What is a KML File? 🤔
A KML file is a type of file that contains map data, like shapes, lines, and points, to represent specific areas or locations. In e-commerce, it’s used to define delivery zones, helping the system understand where orders can be delivered.
Step 1: Create your KML Files Using Google My Maps
- Access Google My Maps and log in with your Google account
- Click "Create New Map" to start a new project
- Use the search bar to locate your desired area
- Draw your zones
- Select the "Add Line or Shape" tool from the toolbar
- Draw your zone by clicking to create connected points until you complete a shape (polygon)
- Repeat this process for all zones you wish to create (single zones are also accepted)
- Export your Data
- Click the Ellipsis in the panel on the left side of your screen
- Select Export Data
- Ensure the
Export as KML instead of KMZ. Does not support all icons.option is selected when exporting.
Only fully connected shapes (polygons) can be imported into Greenline. When creating zones, ensure they are complete, closed shapes and not just lines.
The zone names and colours that you choose on your KML file will be uploaded into Greenline. The zone names are changeable once imported, however the colours are not.

Step 2: Upload your KML File into Greenline
- Access your Greenline Dashboard
- Navigate to the BLAZE ECOM Tab
- Select Configure > Configure Delivery Settings
- Use the drop down to select "KML"
- Select "Upload KML File"
- Import the file you had created in Step 1
- This will create each zone for you and will include the zone area and name set in the file
.gif?width=688&height=298&name=Untitled%20design%20(1).gif)
Step 3: Create Fees for your Zones
Zones are ranked in order of validation
If zones overlap, the system will check within the first zone and if it doesn’t find the coordinate, it will move on to checking the second one, and so on. If you would like to reorder zones, utilize the order arrows on the right side.
- After you have imported your KML file you will see each Zone created from your file
- Select a zone to expand the dropdown
- Enter your desired delivery fee in the fee field
- Click save


What if I need to upload an additional zone?
If you are only adding a single zone, you can create a new file with just that zone and import it using the "Add Zone" button in the upper right of the Delivery Settings Configuration.
If you upload your zones using the "Upload KML File" button, it will permanently replace all of your existing zones with the zones on that file.
Step 4: Enable Your Zones on BLAZE ECOM
- Navigate to your BLAZE ECOM Mission Control
- Access the settings tab > Deliveries > toggle Allow Scheduled Deliveries to on
- Navigate to the Scheduled Delivery Service Area and choose "Allow delivery area restrictions" from the dropdown and select Save

- Next navigate to the settings > Integrations
- Select the Greenline integration
- Select Settings > Toggle Geographical Delivery Zones to on

Flat Rate Delivery
This option allows you to set a consistent delivery fee for all addresses, without the need to define specific delivery zones.
- Select the Flat Rate Option.
- Enter the desired delivery fee.
- Click Save.
-3.png?width=688&height=241&name=image%20(9)-3.png)
Please note that with this approach, you may need to verify each delivery address individually to ensure it falls within a reasonable delivery area.
Postal Code Delivery Zones
With this option, you can offer a more tailored approach to your delivery. Setting up zones gives you the flexibility to charge varying fees based on specific postal codes.
-
Select the Zone Option
-
Click the Add Zone button
-
Expand the zone and enter the following information
-
Zone name
-
Fee
-
Postal Code or Codes of the Zones you would like this fee associated to
-
-
Click Save
-2.png?width=688&height=241&name=image%20(10)-2.png)
-2.png?width=688&height=400&name=image%20(11)-2.png)
Remember:
When inputting values, remember to separate them using commas. The asterisk (*) is your flexible friend here – it acts as a wildcard. By including an asterisk, the system will recognize any postal code that matches the characters you entered just before the asterisk. For instance, if you type in R2*, the system will recognize postal codes like R2P3E1, R2P4E1, R2P5E1, and so on.
And if you enter only the asterisk (*), that's like a magic key that makes the system accept all postal codes across Canada.
If you have specific postal codes within a catch-all postal code, like "N0*," for which you want to apply a different delivery fee (e.g., N0A 1H0), you need to place the full postal code above the catch-all postal code in the hierarchy. This ensures that the full postal code is exempt from the catch-all delivery fee.
Example:
Consider the following setup: All N0* postal codes will have a $25.00 delivery fee, except for N0A 1H0, which will have a $5.00 fee.
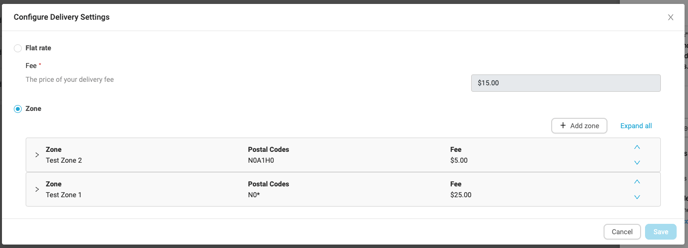
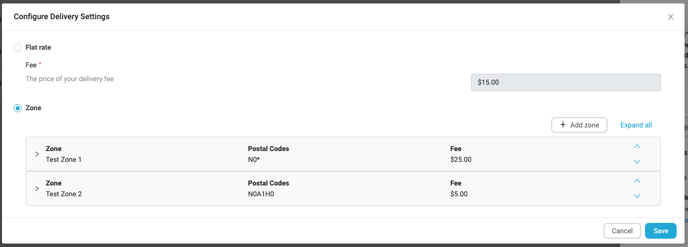
If you reverse the order of these postal codes, as shown below, Test Zone 1 takes priority over Test Zone 2. As a result, all customers entering an N0* postal code, including N0A 1H0, will be charged the $25.00 delivery fee.
Navigating your BLAZE ECOM Dashboard Settings
Please reference the following article to configure your Delivery settings on your BLAZE ECOM Mission Control: click here
FAQ
Can I use different types of delivery settings interchangeably, such as Flat Rate in conjunction with KML?
No, retailers must choose one of the three delivery options to manage their settings. It is not possible to create different zones using multiple delivery configuration methods simultaneously.
For instance, if you select KML as your delivery option and later decide to switch to Flat Rate, a confirmation dialog will appear. This dialog will notify you that all previously established settings will be permanently removed.
Why is my KML file not uploading?
If your KML file has an error, the system will outline this for you when you attempt to import the file. A common error is that the file was exported from Google My Maps as a KMZ file and not KML. Simply, re-export the file and make sure you check: Export as KML instead of KMZ option when exporting from Google My Maps.