![BLAZE-Logo-Blue.svg]](https://help.blaze.me/hubfs/BLAZE-Logo-Blue.svg)
Potency isn’t static. THC and CBD levels vary by lot, and provincial regulations differ on whether you need to track those lots.
To simplify multi-region management, the Potency tab now handles both workflows on a single screen:
- By Location: For stores in regions that do not require lot tracking.
- By Lot: For stores that do.
Why This Matters
Tracking potency by lot or by location depends on each company’s lot-tracking setting.
Product listings span across every company within an organization. The same product can have lot-tracking enabled at one company and disabled at another.
Each potency profile you add to a product can carry multi-location potencies for one company and multi-lot potencies for another, side by side.
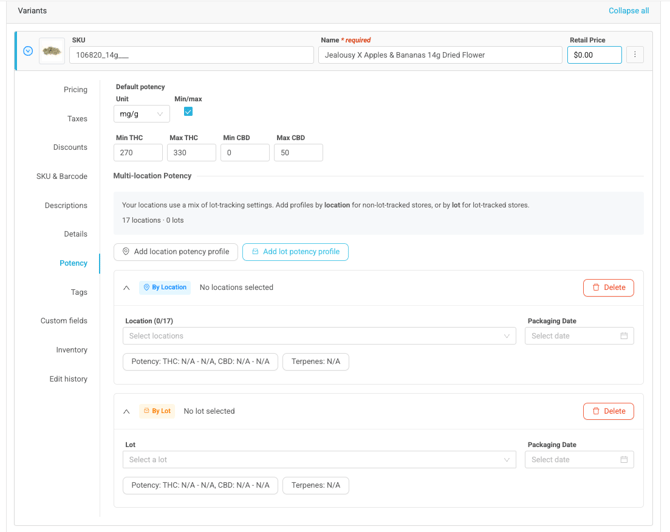
Open a product from the Product List and go to the Potency tab:
- Default potency — the product’s baseline THC/CBD values, with a unit selector (%, mg, etc.) and a Min/max checkbox if you record ranges. Any location or lot without its own profile defaults to these values.
- Multi-location Potency - add profiles by location for non-lot-tracked stores or by lot for lot-tracked stores, with a running count of locations and lots.
- Add location potency profile - location specific potency
- Add lot potency profile - lot specific potency
Each profile is a collapsible card tagged by Location (blue) or by Lot (orange), so you can always tell the two apart at a glance.
Adding a Location Potency Profile
Use this for stores that do not lot-track — potency applies to the whole location.
- Click Add location potency profile.
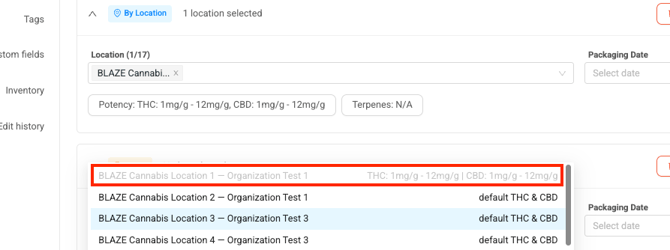
- In the Select locations dropdown, check the location(s) this profile covers. Each option shows the location with its company name and its current or default THC/CBD, so you can see what you’re replacing.
- Set the Packaging Date, if you track it.
- Click the Potency button to open the editor and enter THC, CBD, and any other cannabinoids.
- Use the Terpenes button for terpene values found on product packaging.
- Save the product.
A location can contain only one potency profile. Locations already claimed by another profile — location or lot — appear disabled in the dropdown.
Adding a Lot Potency Profile
Use this for lot-tracked stores — potency follows the batch, not the store.
- Click Add lot potency profile.
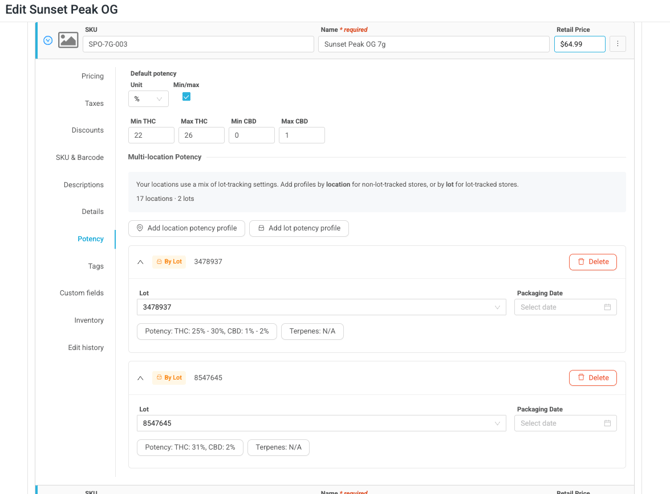
- In the Select a lot dropdown, search and pick the lot. Each option shows the lot/batch number with its location and packaging date. Lots already used by another profile are hidden.
- Set the Packaging Date and enter values in the Potency and Terpenes drawers, just as with location profiles.
- Save the product.
Lots are matched across your organization by batch number. Updating a lot profile on the org product applies it at every company that has a lot with that batch number.
The Potency Editor Drawer
Both card types share the same editor: Potency and Terpenes tabs, a Min/max checkbox for ranges, searchable pickers to add more cannabinoids or terpenes, and a Clear all button. The drawer tidies ranges for you — if you enter a minimum with no maximum, the maximum is set to match; if minimum exceeds maximum, the maximum is raised; a maximum alone gets a minimum of 0.
How saving works across companies
- Location profiles — you can freely include locations from any company in your organization. If a sibling company is missing the matching record, it’s created for you automatically.
What Shows Up at the Point of Sale
For a lot-tracked product, the POS lot picker shows each lot’s own potency values. If a lot has no potency of its own but the store’s location has a location profile, the POS falls back to the location profile’s THC/CBD (and packaging date, where enabled) — so cashiers aren’t left with a blank potency line. A product at a given location always has exactly one effective potency source: the lot’s values if set, otherwise the location profile, otherwise the default.
Good to know
- Min/max ranges entered per location and per lot are what power potency ranges shown across stores.
- Company-level product pages are unchanged — the mixed location/lot editor is an org product feature.
Which Profile Type Should I Use?
|
Situation |
Use |
|
Store’s company doesn’t lot-track this product |
Location potency profile — one set of values for the whole store |
|
Store’s company lot-tracks this product |
Lot potency profile — values follow each batch you receive |
|
Same product, lot-tracked at company A but not company B |
Both — a lot profile for A’s batches and a location profile covering B’s stores, on the same product |
|
No override needed |
Nothing — the location or lot simply uses the Default potency at the top of the tab |
FAQ - Frequently Asked Questions
|
Question |
Answer |
|
Why is a location greyed out in the Select locations dropdown? |
It already belongs to another potency profile (location or lot). Each location can have only one. Remove it there first. |
|
Why don’t I see a lot in the Select a lot dropdown? |
Either it’s already used by another profile, or its location is claimed by a location profile. Lots must also exist — they’re created when a PO is received. |
|
What potency does the POS show for a lot with no potency values? |
The store location’s profile values, if one exists; otherwise the product’s default potency. |
|
Do I have to set potency for every location? |
No. Locations and lots without a profile inherit the Default potency automatically. |
Need a hand? If something doesn’t look right or you’re not sure how your organization is set up, reach out to your BLAZE representative or contact support — we’re happy to help.