BLAZEPAY | How to Navigate Your Merchant Portal
This article provides a comprehensive guide on navigating the BLAZEPAY Merchant Portal, covering key sections such as the Dashboard, Transactions, and Merchant Accounts to effectively manage sales, payments, disputes, and merchant details.
To access the portal from your BLAZE Canada (Greenline) dashboard > navigate to Settings > Payments > Select the location dropdown > on the BLAZEPAY card select the setting cog > select "Go to Merchant Portal" button.
To access the portal directly through your web browser, navigate to https://pay.getgreenline.co
Then utilize your Greenline account to login.
Please note: To log into the merchant portal, use the same Greenline email and password that you set up during the KYC (Know Your Customer) process. Once logged in, you can grant access to other users by adding them to the merchant portal.
To learn how to add other users click here.
Once you have BLAZEPAY configured and accepting payments you need to learn how to navigate your merchant portal.
Section 1: Dashboard
On the BLAZEPAY Merchant Portal Dashboard, you will find the following details across the top banner of the page from left to right for your selected date range:- Total Volume (the totals of your sales)
- Number of payments
- Total Chargeback Volume
- Total Refund Volume
- Average Transaction Total
Underneath the banner, you will find a graph that breaks down your transaction volume on a daily basis per your selected time range.
Underneath the graph, you will find a short list of your most recent payments that have occurred in your account for the selected time range.

Section 2: Transactions
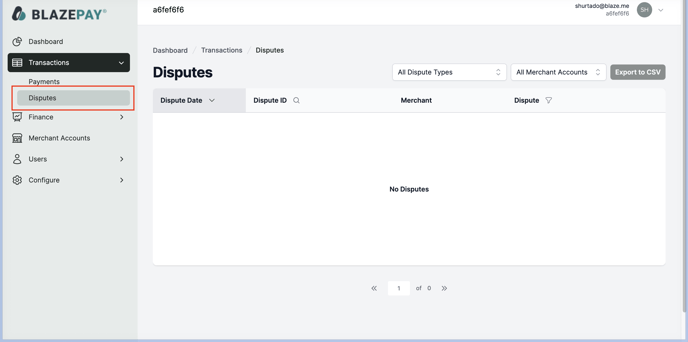
The transactions tab has two sub-sections; Payments and Disputes. We will review each tab below.
Payments
The Payments section contains a list of all your transactions that are occurring with the following details:
- The date & time of the transaction
- The transaction ID
- The merchant (shop) name it occurred at
- The total charge of the transcation
- The type of card used + last 4 of card number
- The status of the payment
See below for a list of payment statuses and meanings:
- Settled - transaction was successful
- Voided - transaction was voided
- Refunded - transaction was refunded
- Disputed - transaction was disputed (go to disputes tab for details)
-2.png?width=688&height=338&name=Untitled%20(2)-2.png)
Disputes
The disputes section will outline a list of all active and settled disputes that have occurred in your merchant account with the following details:
- The date of the dispute
- The dispute ID
- The merchant (shop) name it occurred at
- The dispute status
- Already refunded transactions for which the refund occurred before the chargeback was sent.
- Chargebacks with a fraud reason code for which there was a liability shift. This includes, for example, 3D Secure payments but does not include payments made with digital wallets.
- Chargebacks that include technical errors that invalidate them. For example when a chargeback is sent outside the time frame allowed by the schemes.

Section 3: Finance
The Finance tab consists of several sub-tabs: Account Activity, Payouts, and Statements.
Account Activity
Here you can find details of your daily processing and the expected date for deposits into your merchant bank account, including:
- The captured date: Date the processing took place
- The payout date: Expected date to receive deposits
- Credits total & count: Total amount processed and the number of transactions
- Debits total & count: Total fees generated and the number of transactions

To learn more about BLAZEPAY Fees please checkout our guide by clicking here.
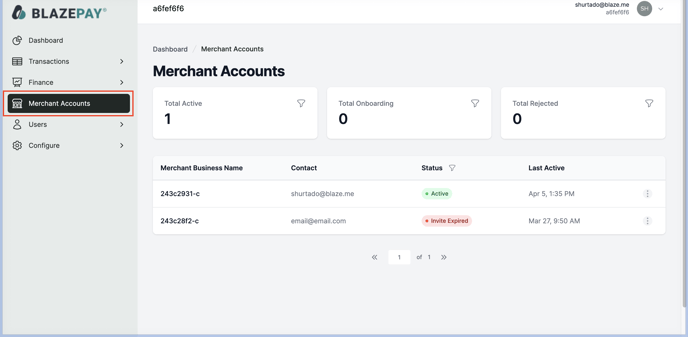
Section 4: Merchant Accounts
The merchant accounts tab will give you a details of the merchants (shops) that your organization has on your account. Here you will be able to see the following details across the top banner of the page from left to right:
- How many total active merchants (shops) that you have in your organization
- How many total onboarding merchants (shops) you have in your organization
- How many total rejected merchants (shops) you have in your organization
Underneath the banner you will see a full list of each merchant (shop) that you have added to your organization with the following details:
- The merchant business name
- The primary contact email listed for the merchant
- The status of the merchant account
- The last tie the merchant was active in the portal

Section 5: Users
The Users tab provides an overview of the active users who can access your BLAZEPAY Merchant Portal.
The table will display the following information for each user:
- Name
- Contact (the email they are using for their account)
- Role
- Status
- Last Active
To add new users, click the Invite button and enter their email address, first name, last name, and role.

Section 6: Configure
The configure tab allows users to customize their portal according to their brand by adding in brand assets and configuring information relating to your settings.
The following settings are available:
- Logo (add your brand logo)
- Branding colour
- Email settings
- Saved Payment Method Settings
-Jul-25-2024-01-35-43-9931-PM.png?width=688&height=349&name=image%20(1)-Jul-25-2024-01-35-43-9931-PM.png)
-Jul-25-2024-01-35-48-2042-PM.png?width=688&height=343&name=image%20(2)-Jul-25-2024-01-35-48-2042-PM.png)
