Get an overview of all the sales that have occurred in your BLAZE POS in the Sales > Sales List section on your Dashboard. Users can select multiple locations and date ranges if necessary. You can view the sales ID, POS device, payment type, employee name, and more.
Utilize the filters at the top of the page to get a more granular view of your sales. You are able to filter by location, date ranges, online order discrepancies (from e-commerce), sale ID, payment type, customer, employee, POS device, status, source, and by specific products.

Note: to export your sales list into a .CSV file click "Export" in the top right corner of the screen.
Saskatchewan customers can add a sale manually by selecting the "+ Add manual sale" option in the top right.
View Sale Details
To view more information on a specific sale, click the row to expand a dropdown that will provide more information, allow you to send or print the sales receipt, and initiate action items relating to the sale.
+(1)-4.gif?hsLang=en)
View Receipt
Clicking the "View receipt" button will launch a popup of the receipt that allows you to email it directly to a customer or print it.
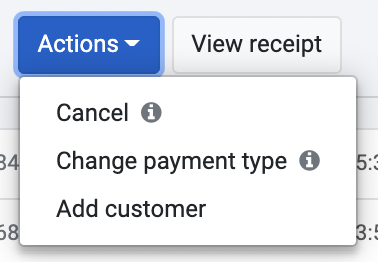
Actions Dropdown
The actions button will allow you to cancel a sale, change the payment type, and add a customer to the sale.
How to Cancel a Sale
-
Click on the row of the sale you would like to cancel.
-
Click on the blue "Actions" button.
-
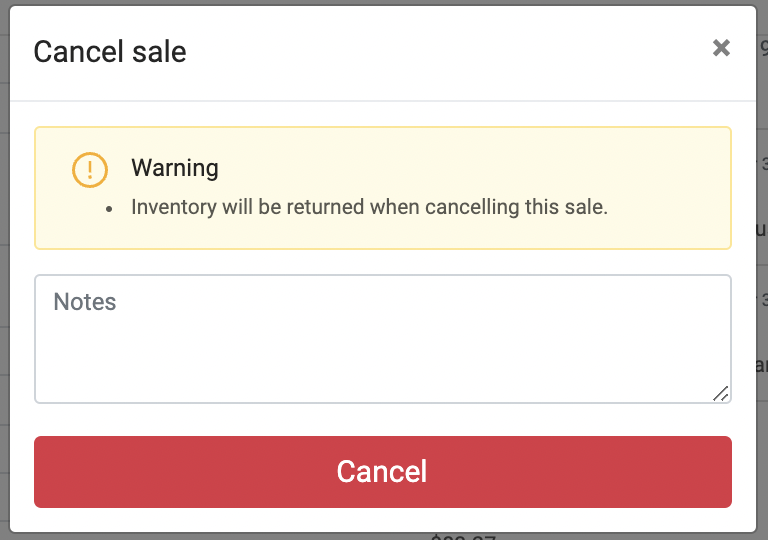
When you click on the cancel option, a pop-up will open to proceed with the action.
-
When cancelling a sale, inventory will be returned to the system.
-
Click on the Submit button to complete the action.
Click on the row of the sale you would like to cancel.
Click on the blue "Actions" button.
When you click on the cancel option, a pop-up will open to proceed with the action.
When cancelling a sale, inventory will be returned to the system.
Click on the Submit button to complete the action.
Notes:
-
Cancelled sales will not show up on reports and inventory will be returned. This does not revert processed (debit or credit) payments. You will need to return the payment separately through your payment provider.
-
Customers will only be able to cancel sales within the current month. If you need to cancel a sale from the previous month, please contact support-ca@blaze.me.
-
Important: Once a sale has been cancelled, you can no longer change the payment type because the system recognizes that no sales transaction or transfer of money or product occurred.
Important: Once a sale has been cancelled, you can no longer change the payment type because the system recognizes that no sales transaction or transfer of money or product occurred.
How to Change the Payment Type
-
Click on the row of the sale you would like to change the payment type for.
-
Click on the blue "Actions" button.
-
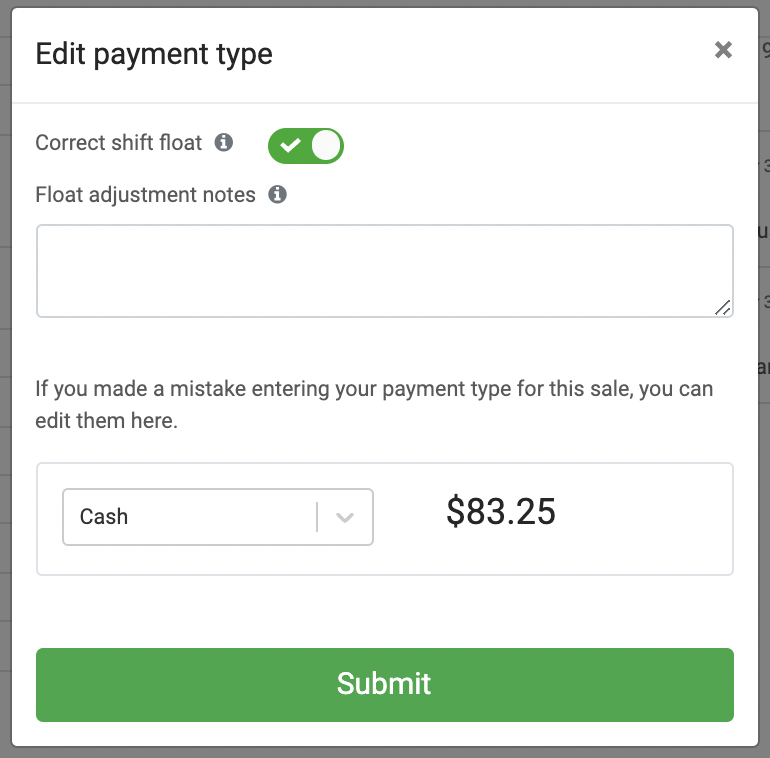
When you click the change payment type option, a pop-up will open to proceed with the action.
-
When changing the payment type, you can choose tovcorrect the shift float, add float adjustment notes, edit payment quantities, and change the original payment type(s).
-
Click on the payment type selection bar (which will display the current payment method) and select your new payment type.
-
If changing the payment type to Moneris or Merrco, you will be asked to enter the Transaction Auth # which can be found on the terminal receipt.
-
Click on the Submit button to complete the action.
Notes
-
Users may decide to select the "Correct shift float" option which will adjust the sale's shift according to the changes you make. In addition, entering in any "Float adjustment notes" will show up on the end-of-shift receipt to reflect the change.
How to Add a Customer to a Sale
-
Click on the row of the sale you would like to add the customer to.
-
Click on the blue "Actions" button.
-
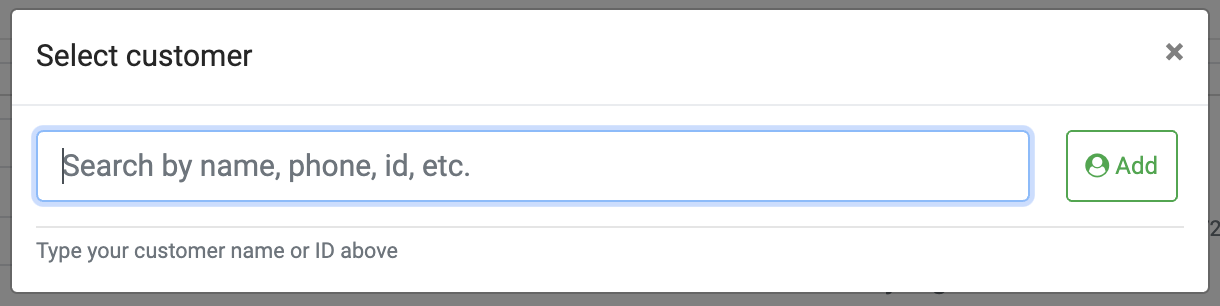
When you click on the add customer option, a pop-up will open to proceed with the action.
-
You can search for the customer by their name, email, phone number, ID, etc.
-
If you want to create a new customer profile to be added to the sale, click the add button and enter the customer's information.
Notes:
-
Once a customer is added to a sale, they cannot be removed and a new customer cannot be added.
-
Once a customer is added to a completed sale, that sale will be added to their purchase history. If you have a loyalty program in place, credits from this sale will be added to the account. Pending and in-progress sales will not add these records until the sale is marked completed.
How to view reports relating to payment type?
You can also view payment type-specific reports from your dashboard by going to the following:
-
Reports > Financial > Payment types
-
Reports > Financial > Summary