Connect your Worldpay terminals to BLAZE for an integrated payment solution
BLAZE has partnered with Worldpay to deliver world-class payment processing to all cannabis retailers. Worldpay is one of the largest payment processors in the world and offers free terminal rentals, competitive rates, easy setup, and high uptime.
To get started, reach out to our sales team at sales-ca@blaze.me and they will connect you with the appropriate representative.
What terminals are supported?
-
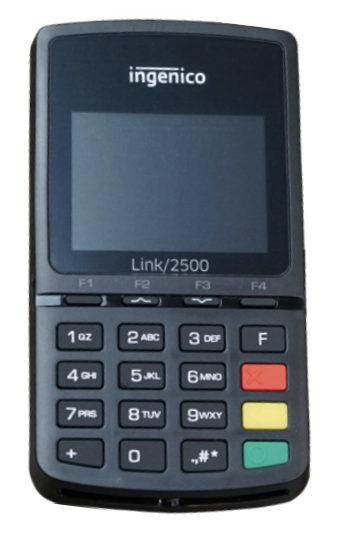
Link/2500 (WiFi)
-
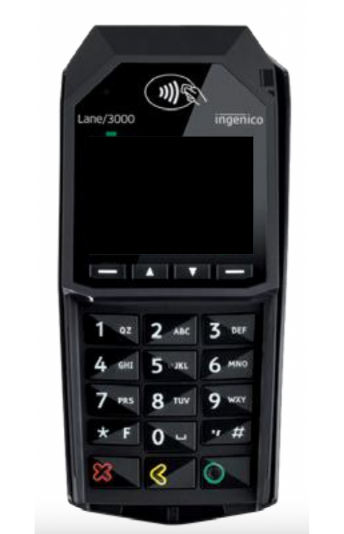
Lane/3000 (LAN)
How do I connect my devices to the network?
Link/2500
⚠️ Before attempting to utilize your terminal, ensure the battery is fully charged.
Follow the steps below to connect your terminal to the network.
-
Turn on the terminal by pressing the green button on the keypad
-
When the device is powered on, press 0-0-0-1 on the keypad to access the admin menu
-
Press 2 to select WiFi Parameters and select Enable
-
Select Scan Networks and select the network you want to connect to from the populated networks
-
Enter your network's WiFi password
-
Press the green "enter" key
-
Press the yellow key and # key to reboot your device
-
Your device should now show a terminal activation code which will be a P followed by six numbers - this code will be used to establish a connection to BLAZE (the code refreshes periodically).
(Optional) Setting up a Static IP Address
You will need to know your router's IP address and subnet mask. To find this information, click here.
-
Turn on the terminal by pressing the green button on the keypad
-
When the device is powered on, press 0-0-0-1 on the keypad to access the admin menu
-
Press 2 to select WiFi Parameters
-
Press 4 to select Default IP Configuration
-
Select DHCP activation and press the green key
-
Using the arrow select off and press the green key
-
Select IP address and press the green key
-
Choose an IP address on your network as a Static IP
-
IP Address should start with the same numbers as your Router's IP Address, and unique 3 digits for the last number
-
ex: Your router IP Address: 192.168.0.1
Worldpay Terminal IP Address: 192.168.0.200
-
-
For each additional BLAZE terminal and Worldpay terminal, you must create a NEW unique IP address for each device.
-
-
Input your selected Static IP Press the green key
-
Select Subnet Mask and press the green key
-
Input 255.255.255.0 and press the green key
-
Select Gateway Address and press the green key
-
Input the router's IP address and press the green key
-
Press the red "cancel" key one time
-
Press the green key to select yes on the "do you want to save these changes" message
-
The terminal may reboot on its own, if not, press the yellow key and # to reboot the device
-
Your device should now show a terminal activation code which will be a P followed by six numbers - this code will be used to establish a connection to BLAZE (the code refreshes periodically).
Lane/3000
Currently, this device is only supported via a LAN (hardwired) connection.
Follow the steps below to connect your terminal to the network.
-
Connect the terminal to your router/network switch using the provided Ethernet cable
-
Connect the power cord to the back of the terminal and plug it into an outlet. The device will power on
-
Your device should now show a terminal activation code which will be a P followed by six numbers - this code will be used to establish a connection to BLAZE (the code refreshes periodically).
(Optional) Setting up a Static IP Address
You will need to know your router's IP address and subnet mask. To find this information, click here.
-
Disconnect the Ethernet cable that is connecting your device to your router/network switch and leave the device powered on
-
Reboot the device by holding the green and yellow buttons for two seconds
-
When the device is powered on, press 0-0-0-1 on the keypad to access the admin menu
-
Press 1 to select Communication type and ensure it is set to Ethernet
-
Ensure Communication type is set to Ethernet
-
Select yes when the device asks you to reboot
-
-
Access the admin menu and press 2 to select Ethernet parameters
-
Press 1 to select IP Configuration
-
Select DHCP activation and select off
-
Press the green key
-
Select Subnet Mask and enter the subnet mask (255.255.255.0)
-
Press the green key
-
Press the red key
-
Press the green key again to save your changes
-
Press the red key again to reboot the device
-
While the device reboots, reconnect the ethernet cable to your router
-
Your device should now show a terminal activation code which will be a P followed by six numbers - this code will be used to establish a connection to BLAZE (the code refreshes periodically).
How do I connect my terminals to BLAZE?
Step 1: Making a Connection on the BLAZE Dashboard
-
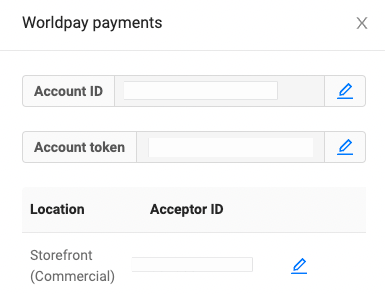
Access your BLAZE dashboard > Settings > Payments

-
Click the configuration section on the Worldpay Payments block

-
This will initiate a pop-up menu on the right side of your screen, here you will be able to enter your Account ID and Account Token by clicking the edit button. Once you enter the values. Click the save button. These will be provided by Worldpay.
If you are adding multiple locations, each location will have its own Acceptor ID.

-
Once these fields have been added, you will be able to add acceptor IDs for each location. These acceptor IDs will be used on the POS to establish a connection between the terminal and the system. Acceptor ID will be provided by Worldpay.
Access your BLAZE dashboard > Settings > Payments

Click the configuration section on the Worldpay Payments block

This will initiate a pop-up menu on the right side of your screen, here you will be able to enter your Account ID and Account Token by clicking the edit button. Once you enter the values. Click the save button. These will be provided by Worldpay.
If you are adding multiple locations, each location will have its own Acceptor ID.
Once these fields have been added, you will be able to add acceptor IDs for each location. These acceptor IDs will be used on the POS to establish a connection between the terminal and the system. Acceptor ID will be provided by Worldpay.
Step 2: Making a Connection on your BLAZE POS Device
-
Access your BLAZE POS device and navigate to Settings > Payment Options
-
Toggle the Worldpay payments to on (green)
-
Click the gear icon beside Worldpay

-
Enter your Manager passcode to access Worldpay connections.
-
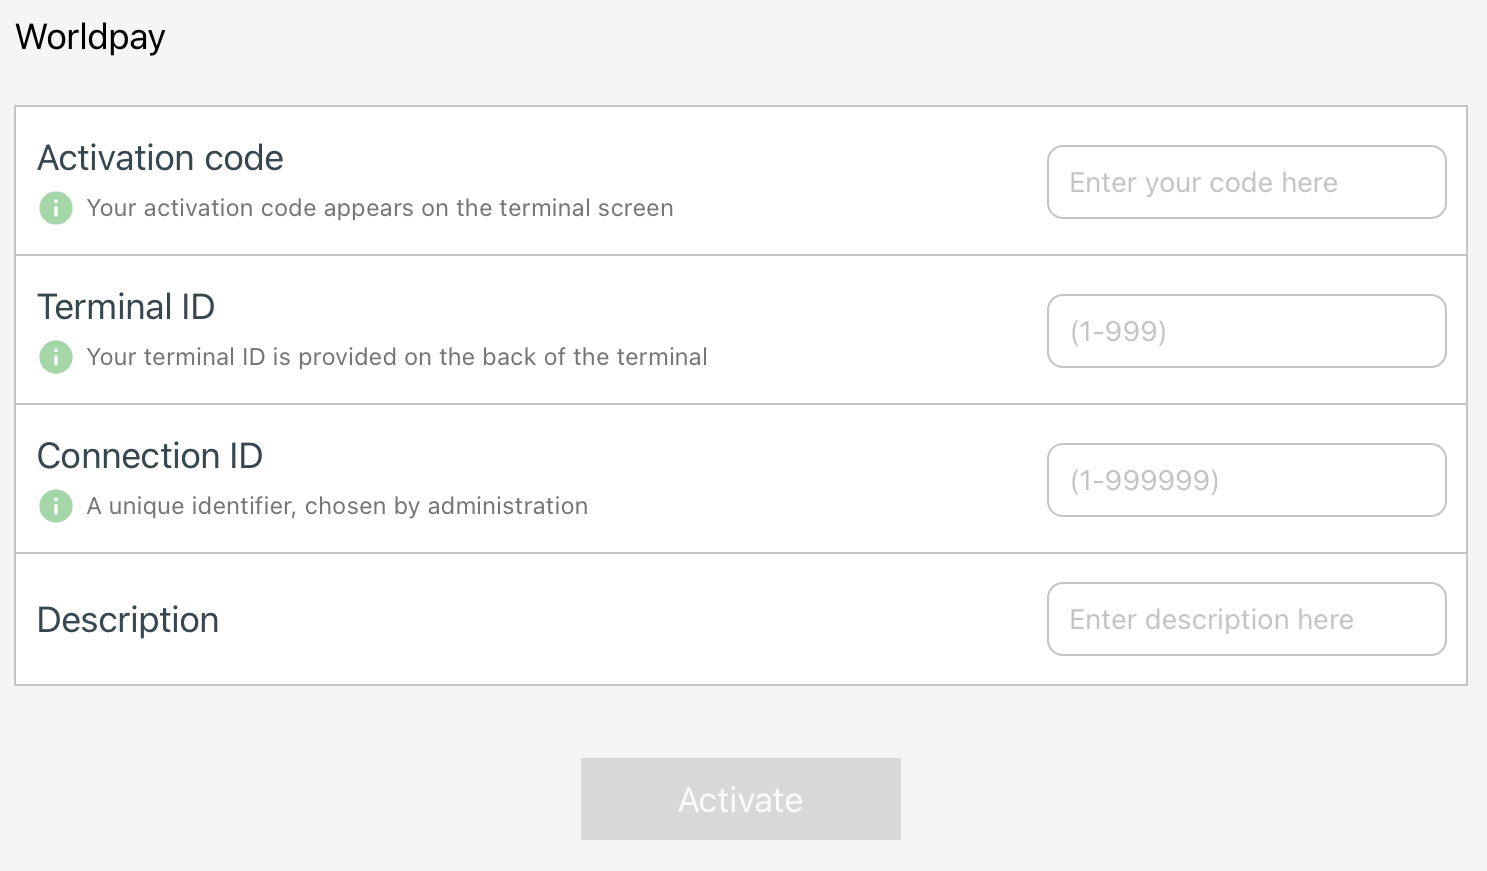
Click Create New Connection button

-
Enter in the necessary information
-
Activation Code (available on the terminal screen, see reference)
-
Terminal ID (a unique identifier as chosen by your team that will represent the terminal ID on your bank deposits. There will be one bank deposit per terminal ID) ex: 123
-
Connection ID (a unique identifier for each terminal as chosen by your team) ex: 001
-
Description (a description to help identify the terminal - optional)

-
-
Click Activate


Note: It will take a few minutes to create a new connection.
Reconciling Your Invoice
If you have a Worldpay terminal, you must complete an EOD (end of day) “reconciliation” report at the end of each day’s sales. You must do this within your allocated banking window.
Completing an “end of day” report checks that the transactions have been processed correctly and are not stored in the Worldpay terminal. If funds are stored in the terminal it can delay the funds being credited to your account. You will also find the report very useful to help reconcile your accounts.
Worldpay EOD Reconciliation-
From the Worldpay READY menu:
-
Hit menu twice
-
Select totals
-
Select EOD banking
-
Key in 4 digit Supervisor code
-
Select enter when you see the EFT prompt
-
Press enter again for all card types
-
PRINTS
-
Select menu again to reprint
-
Select enter to finish
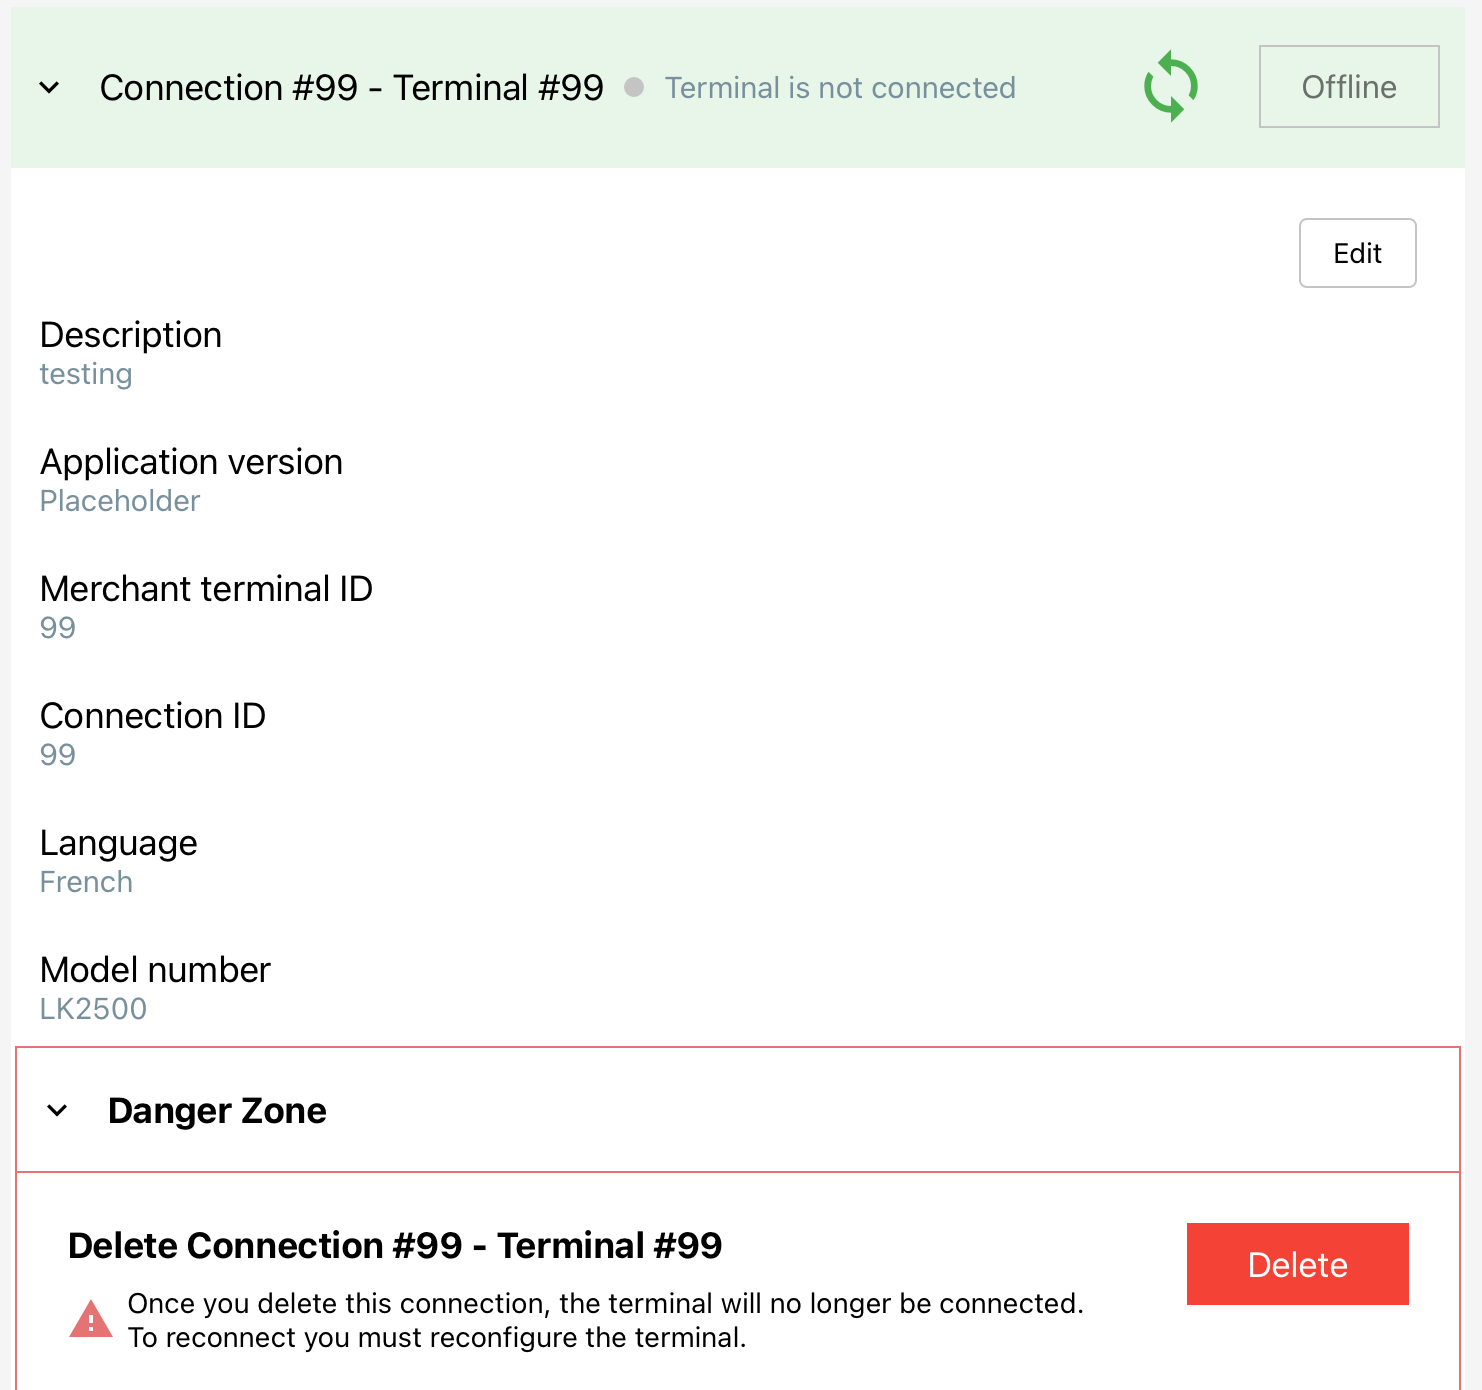
How to Edit a Terminal Connection
-
Access your BLAZE POS device and navigate to Settings > Payment Options
-
Click the gear icon beside Worldpay
-
Click the Edit button for the appropriate terminal
-
Choose Language: English or French.
-
Click the save button.
How to Delete a Terminal Connection
-
Access your BLAZE POS device and navigate to Settings > Payment Options
-
Click the gear icon beside Worldpay
-
Click the arrow beside the appropriate terminal to expand a drop-down menu
-
Under the "Danger Zone" section, click Delete
-
This will delete the connection, to re-connect it, you will need to go through the connection steps again
FAQ
Where do I find the terminal ID?
Your team can choose a terminal ID between 1-999. It is used for batch settlement and bank deposits. If you decide to use multiple terminal IDs, you will receive multiple bank deposits into your account (one deposit per terminal ID).
Will the receipts print directly from the payment terminal?
No, your payment receipts will come directly from the printer hooked up to your POS device.
Can Worldpay Integrate with all e-commerce providers?
Currently, Worldpay can be integrated with your WooCommerce platform only.
How long after purchase can I process a customer refund?
Refunds will be able to be processed up to 48 days after purchase.
Can my terminals be connected to multiple POS devices at once?
Yes, they can be connected to multiple terminals at once and will create a payment queue if payments are submitted at the same time.
Can my terminal accept multiple payments of the same amount by the same card in a transaction batch?
No, Worldpay does not allow multiple transactions by the same card and amount within the same transaction batch in order to avoid fraud (24-hour time window).