Before you get started, you will need to create banner images to upload to Blaze ECOM Mission Control (MC). This can be accomplished in graphic design programs such as Adobe Illustrator/Photoshop, Canva and many others.
Log into your Blaze ECOM Mission Control and click the Banners header near the bottom left corner of the page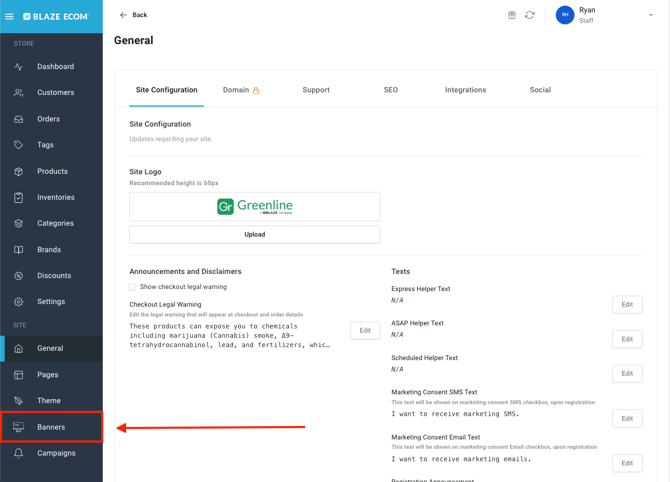
Click Add Banner in the top right corner


Banner Settings
- Desktop and Mobile Image
You will need banner images for both Desktop and Mobile internet browsers. Pay particular attention to the image size recommendations.
Click Upload and select the appropriate image from your computer hard drive. - Position
This determines the order in which your banners appear on your ECOM storefront. Keep in mind that banners scroll from right to left every 5 seconds or so - this interval cannot be changed. - Title, Description and Destination URL
- Title: an internal identifier to help manage banners in the list view
- Description: a short description of the banner. Only displays if the banner image fails to load.
- Destination URL: input the web address (URL) of the page that you want the banner to link to
- Date/Time Settings
- Publish: from the drop-down, select Schedule or ASAP
- Schedule: enables the ability to set a date and time for the banner to trigger and display on your ECOM storefront
- ASAP: immediately and automatically enables the banner on your store
- Publish: from the drop-down, select Schedule or ASAP
Finally, click Add Banner to save the banner to your ECOM MC.
Active Status
To ensure that your newly created banner displays on your ECOM storefront, make sure to turn ON the toggle under Is Active on the banner list page. You may disable or enable the banner at any time. 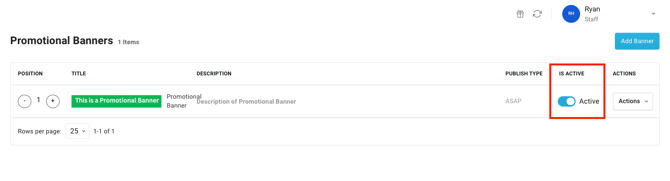
Scheduled Banners
When a banner has scheduled start and end dates, its status is determined automatically. It will be either Active or Inactive based on the schedule, and cannot be changed manually.