POS ( Browser) | WebPOS Receipt Printing Troubleshooting
Update Printer Drivers
Before you start, ensure that you have the respective device drivers for your receipt printer. The links can usually be found on the STAR/EPSON product support pages.
My receipts are printing too long
This happens when the Headers and footers printing option is checked, which is usually on by default. To fix this:
Bring up your print dialogue
-1.png?width=688&height=1705&name=image%20(60)-1.png)
Unselect the Headers and footers section. Try printing a test receipt to ensure that the receipt length is now correct.
If this does not work you may need to update your printing properties:
-
On your windows device navigate to your control panel
-
Choose "view devices and printers"
-
Right click on your StarMicronics printer
-
Select the "printing preferences" button
-
Select the advanced button
-
Under "paper/output" change your paper size to 72mm x 200mm
-
Click OK or Apply
-
Navigate back to "view devices and printers"
-
Right click on your StarMicronics printer
-
Select the "printing properties" button
-
Click the "device settings" tab
-
Change your FRICTION setting to: 72mm x 200mm
-
Click OK
*Please ensure that Paper Source is set to Friction and not automatic.
My receipts are not automatically printing
It can be annoying to have to confirm receipt printing for every sale. Once you've fully configured your receipt printer, you can configure Chrome to not ask you if you want to print a receipt every time.
-
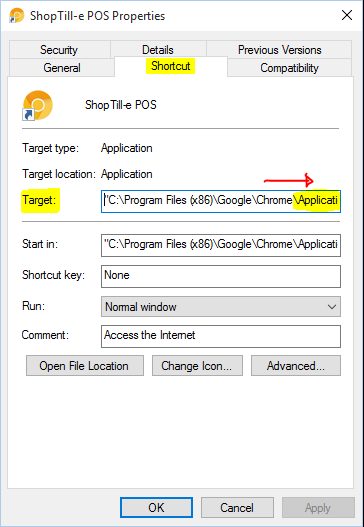
Right click your Chrome desktop shortcut, then click properties.
-1.png?width=688&height=964&name=image%20(61)-1.png)
2. Update Target with the following additional text:
--kiosk-printing --kiosk "https://app.getgreenline.co/pos/sale" (include a space before the --)


3. Close Chrome, and re-open using the Chrome icon you've just modified. Now, printing should happen automatically.
My cash drawer is not opening
This can happen if the printer driver doesn't automatically set the cash drawer to open on every sale. Before proceeding, ensure that your cash drawer is connected to your receipt printer using the following cable:

If you are able to print receipts, but the cash drawer is not opening, go through the following steps for Windows 10.
-
Search for Printers and scanners in the search menu
-1.png?width=688&height=1125&name=image%20(62)-1.png)
2. Select your receipt printer
3. Click Manage
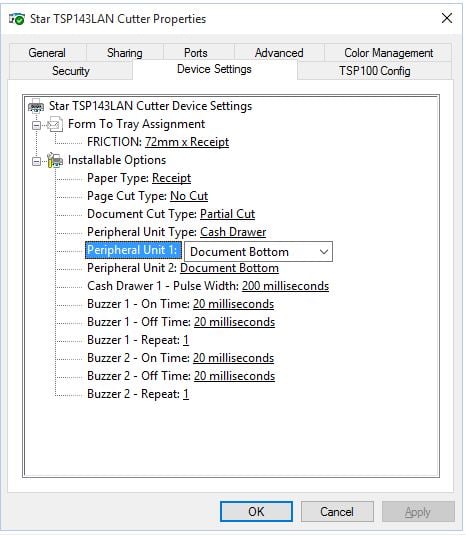
4. Click Printer properties to get the following screenshot

5. Go to Device Settings
6. Set Peripheral Unit Type to be Cash Drawer
7. Set Peripheral Units 1 and 2 to be Document Bottom
8. Press Apply
Done! On the next print, your cash drawer should open automatically.
If the above does not fix your cash drawer opening issue, it may be related to a known problem on the Windows 10 platform that affects the cash drawer movement. To fix this issue, follow these steps:
-
Download the latest start software by clicking here.

-
Open the utility software and configure your printer with the appropriate settings (Bluetooth or LAN)
-
Click Windows Printer Queue Management
-1.png?width=655&height=563&name=image%20(63)-1.png)
-
Click the into the Properties section
-1.png?width=655&height=563&name=image%20(64)-1.png)
-
Navigate to the device settings tab > change Peripheral Unit 1 to Type: Cash > change Timing: Document Bottom. Select OK.

-
Your cash drawer should now open.