Greenline has partnered with Venture Sourcing Group, a Canadian-based hardware provider whose aim it is to streamline how you purchase technology and point of sale hardware.
Please see the Venture Sourcing Group's website at the link below for more information:
Here are a few considerations:
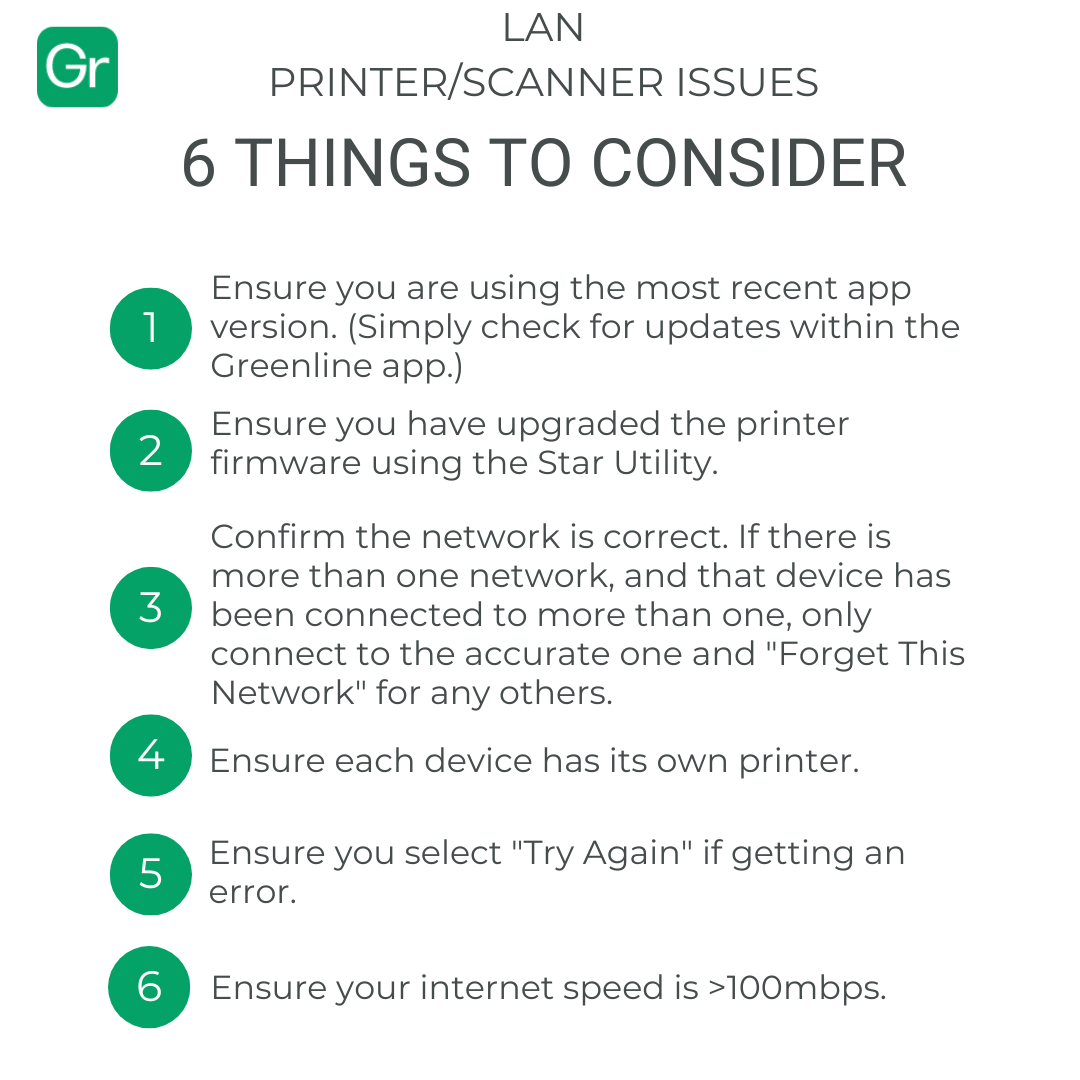
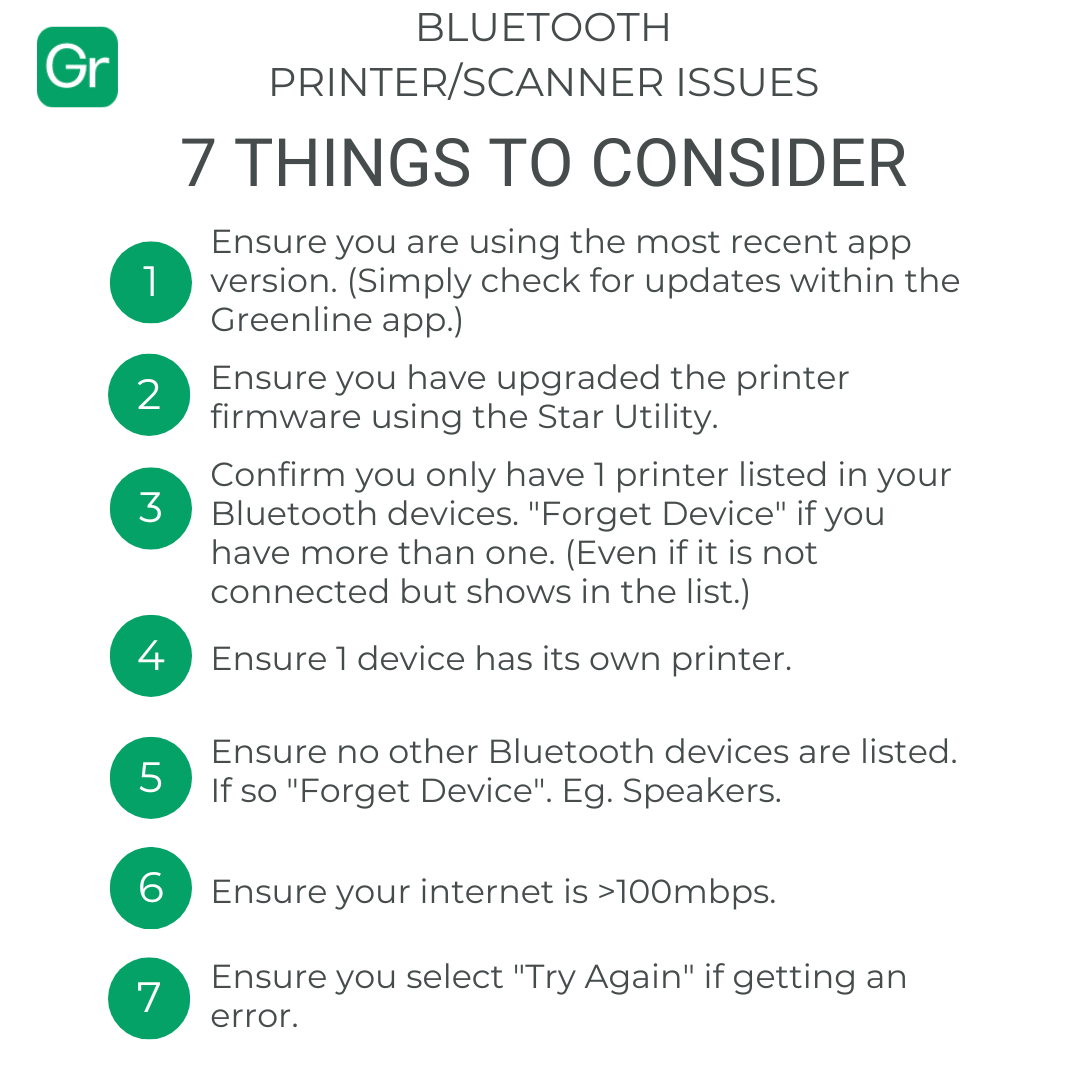
You will need to download the Star Quick Setup Utility application from your mobile app store and ensure your firmware is updated to v3.6.
-
Select your printer
-
Go to the main menu and select printer settings
-
Select firmware update
-
Select the firmware update and wait for the update to complete
You will need to download the latest driver when using the mC-Print3 printer with macOS or Windows.
-
Select product type: Thermal
-
Select printer family: mC-Print3
-
Select the appropriate operating system
-
Download and install the driver
After installing the driver you will need to restart the device before setup.
For macOS users, make sure to download the "CUPS Driver for macOS"
Compatible printer models for Bluetooth connection:
-
MCP31LBi (recommended for iOS)
-
MCP31LBi NH (recommend for iOS)
-
MCP31CB (recommended for Android - Bluetooth will not work with iOS on this model)
Compatible printer models for LAN connection:
-
MCP31L (recommended for Windows and iOS)
-
MCP31LBi (recommended for iOS)
-
MCP31L NH (recommended for iOS)
-
MCP31LBi NH (recommended for iOS)
-
MCP31C (recommended for Android)
-
MCP31CB (recommended for Android)
Bluetooth Connection
The mC3-Print3 can connect to your iPad, or Android device via Bluetooth.
-
Windows PCs or Macs have not been confirmed for a Bluetooth connection.
-
When connecting a printer via Bluetooth on Android, the device name will show up as "unknown."
Compatible printer models with Bluetooth connection:
-
Turn on your printer by pressing the power button located on the front of the printer.
-
Open the Settings screen on your device.
-
Find the Bluetooth settings option.
-
Ensure the Bluetooth button is toggled to the on position.
-
Select your mC-Print3 device and verify a connection has been established.
-
Please log in to your BLAZE POS application.
-
Open the menu by clicking the GR logo in the top left corner of the screen.
-
Go to Settings > Receipt Printing
-
For IOS users: (Andriod users can skip to step 10 as V2 is the default for Android)
-
Under Select, Print Version ensure that you are selecting: Version 2

-
-
You should see your mC-Print3 device available in the "Select Primary Printer" section.
-
If you do not see the printer, try clicking "Refresh printer list"
-
-
Click the blue select button to pair the printer.


Note: Secondary Printers are usually utilized for back-of-house printing. If you are not using this you can leave this field empty.
LAN Connection
The mC3-Print3 can connect to your iPad, Android device, PC, or Mac via a LAN connection. (MCP30 is the only model recommended for use with a PC or Mac for LAN connection)
-
Connect your printer to your router via an ethernet cable.
-
Ensure your POS device is connected via WiFi to the same network.
-
To check your printer's IP address: turn the power off, hold the feed button and press the power button then release. Once the printing has started, release the feed button.
-
Your network information will be included in this printout.
-
-
Please log in to your BLAZE POS application.
-
Open the menu by clicking the GR logo in the top left corner of the screen.
-
Go to Settings > Receipt Printing
-
For IOS users: (Andriod users can skip to step 7 as V2 is the default for Android)
-
Under Select, Print Version ensure that you are selecting: Version 2
-
-
You should see your mC-Print3 device available in the "Select Primary Printer" section.
-
If you do not see the printer, try clicking "Refresh printer list"
-
-
Click the blue select button to pair the printer.

In addition to the other methods described above, we have added another way to connect your receipt printer to BLAZE if you are using iOS. After updating BLAZE you will be able to connect your Bluetooth or LAN-enabled receipt printer using USB instead of Bluetooth or LAN.
***Only MCP31L and MCP31Bl on iOS will work with this new method. (does not include MCP31L NH and MCP31Bl NH)***
-
First, unplug the LAN cable for a LAN printer, or disconnect from Bluetooth and forget the Bluetooth printer in the device settings.
-
Make sure you are using the port labelled as 2.4a on the receipt printer. The other ports will not be compatible.
-
Use the correct cable, for iPad USB B -> Thunderbolt.
-
Refresh your printer list in BLAZE's POS settings.
-
Select the new printer with USB at the start of the name.
Now you should be all set to use your receipt printer and scanner with a more reliable hard-wired connection.
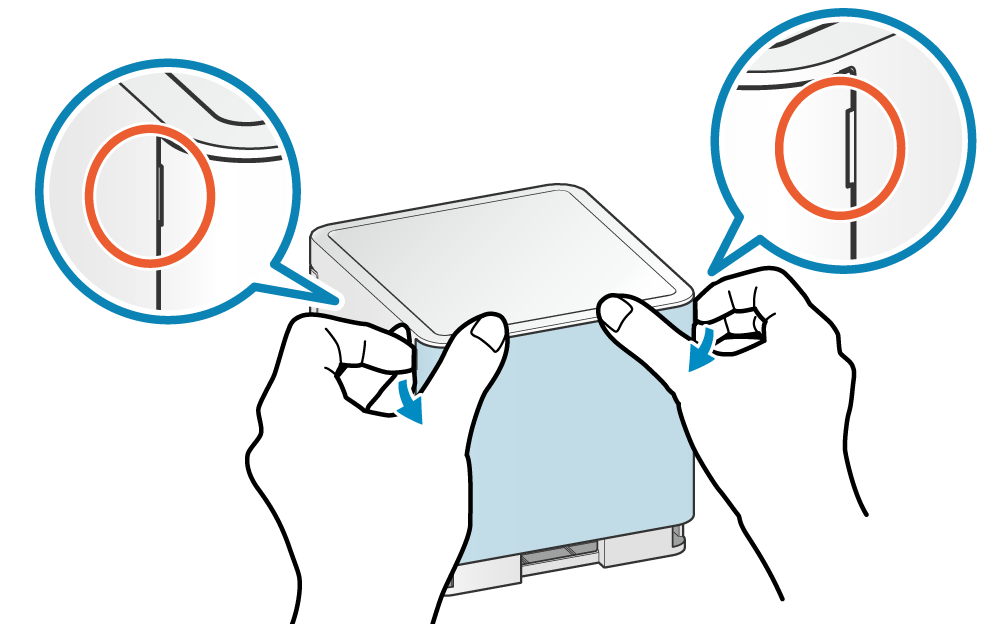
Hardware Setup
To connect the power supply and connection cables, you'll need to first remove the back panel. To do this, insert your fingernails into ridges on the left and right side of the back panel then pull each side out one by one.
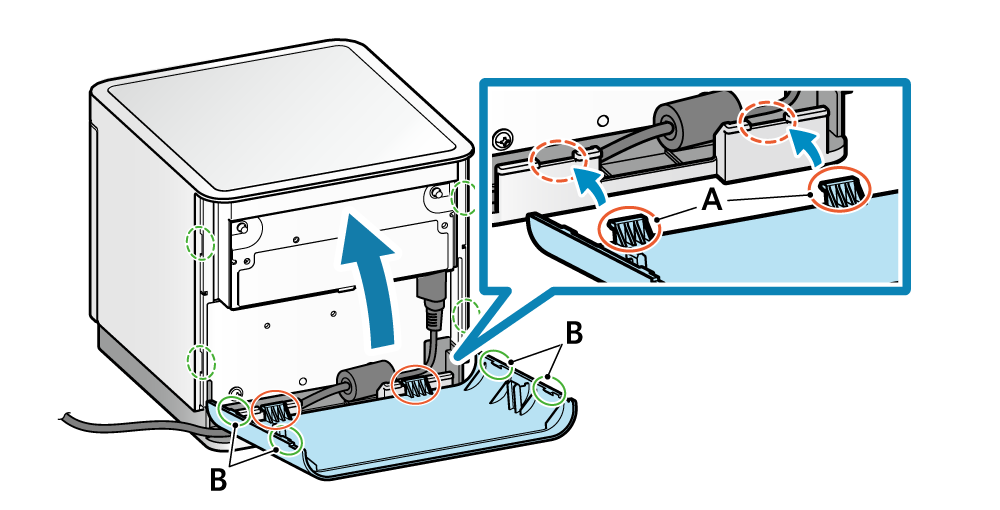
Mount rear cover
-
Align the hooks on the rear cover to their corresponding notches on the main unit. Apply the rear cover onto the main unit lightly until you hear a click.

Align the hooks on the rear cover to their corresponding notches on the main unit. Apply the rear cover onto the main unit lightly until you hear a click.
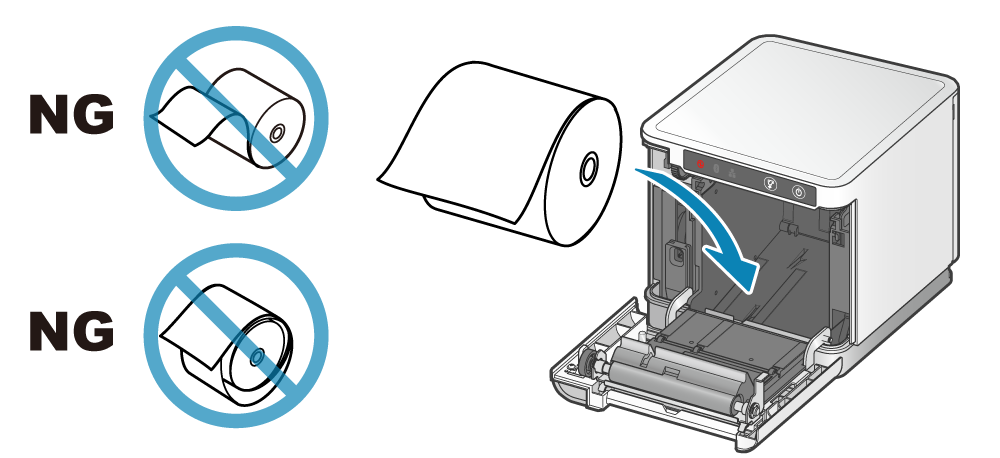
Inserting the Paper Roll
-
After your connections are all in place and the rear panel has been reapplied, power the printer on.
-
Use the opening lever on the front of the printer to open the print cover.
-
Add the paper into the machine and make sure the roll is tightly wound to avoid paper jams.

-
Pull the end of the paper roll straight out and close the print cover. Connecting the Power Adapter and Cash Drawer

-
Plug the power cord into the AC adapter and then plug the AC adapter securely into the power connector port of the printer.
-
Plug an ethernet cable into the cash drawer and then into the appropriate cash drawer port on the printer.
Note: click here for the full mC-Print3 operation manual. This article will simplify the information needed for you to get started quickly.