Hardware | TSP-100 receipt printer for iPad
TSP-100 receipt printer for iPad

BLAZE supports the TSP-100 receipt printer, pictured above. It comes in 2 different models:
-
Bluetooth model. This is the standard offering that works well for 1-to-1 pairings with iPads. They're easier to set up and configure than the LAN model.
-
LAN model. This is the only model that supports multiple iPad connections at the same time. We don't recommend this model if you don't have IT staff on hand who understands networking.
The full manufacturer manual can be found here, but in this article we will simplify the information needed for you to get started quickly.
Initial setup

-
First, open up the device to load in your receipt paper. Make sure that your roll is in the right orientation, then clamp the lid shut tightly.
-
Your cash drawer should come with a RJ12 cable that plugs directly into your receipt printer. Plug it in. When a receipt prints, the cash drawer will automatically open.
-
Next, plug in the power cable into the printer.
-
Your printer should be automatically in Bluetooth pairing mode.

-
Next, go into your iPad, and open the settings app.
-
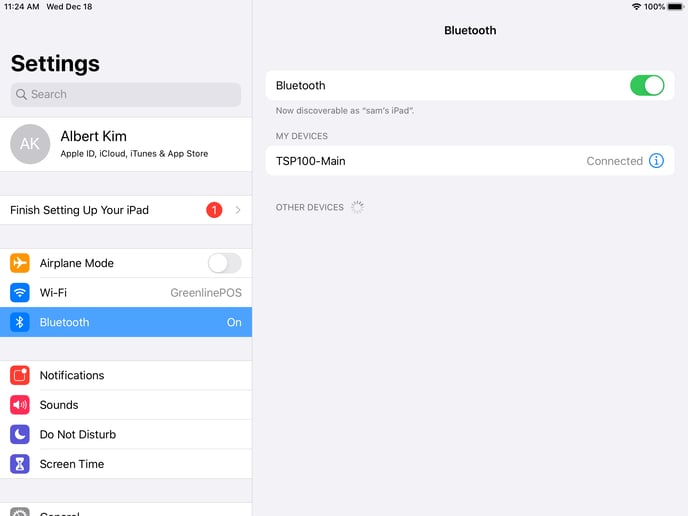
Go into your Bluetooth settings, and select your TSP-100 device.
-
Once the device says "Connected" on the right-hand side, we've successfully established our connection.
-
Next, we need to set up our BLAZE app to use this printer.
BLAZE app setup
-
Log into the app with your device ID + password
-
If you haven't started a shift yet, enter a $0.01 shift to get started
-
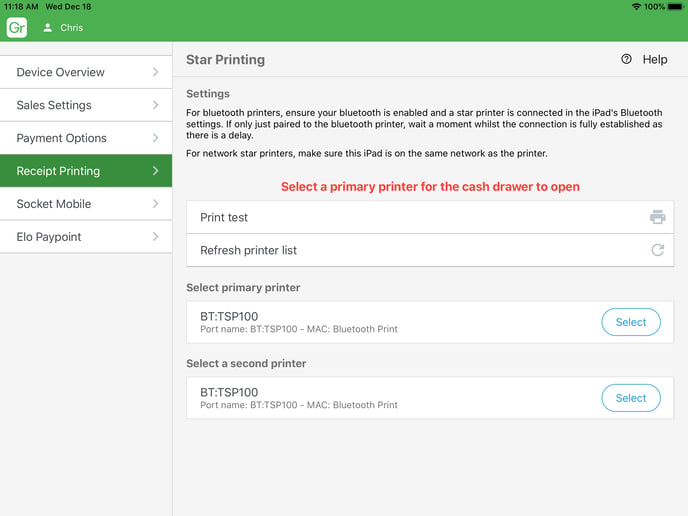
Go to the left-hand menu > Settings > Receipt Printing
-
In the "Select primary printer" section, you should see a BT:TSP100 printer available.
-
Press the blue "Select" button to select the printer.

-
If you don't see any printers available, press the "Refresh printer list" option. Otherwise, go back to the iOS settings app and ensure that the printer is paired.
-
If you don't need a secondary printer (usually used for back-of-house printing), you can leave it empty.
Multi-printer setup
-
Useful if you have staff at the back of your store passing products to the front-of-store sales employees.
-
The secondary receipt printer must be set up as a LAN printer. This is because Bluetooth connections can only connect one device.
-
Set up your LAN printer in the back with the assistance of an IT professional.
-
Ensure that each of your iPads are on the same network.
-
Go to your BLAZE POS Settings page > Receipt Printing.
-
In the BLAZE app settings page, select your LAN printer as your secondary printer.
Troubleshooting
-
The BLAZE app says "Error printing receipt". This is most likely due to a hardware mis-configuration on your receipt printer. Make sure that your paper roll has the right orientation and that the lid is fully shut.
-
The BLAZE app is not longer connected to the receipt printer. This is likely due to a failed Bluetooth connection, which can occasionally happen. First, make sure that your printer is powered on, then go into your iOS settings app and try to re-establish the connection. If you don't see the printer show up at all, you will have to reset the printer by pressing the "RST" button in the back of the printer, then going through the setup steps again.
-
The printer is selected as a secondary printer, but I need a primary printer. A printer can only be set as either the primary or secondary printer. To move the printer, press the blue "Selected" button next to your secondary printer to free it up, then select it as your primary printer.
-
I have too many printers, so it's difficult to identify which printer is what. This is a valid concern at larger stores where you might have 10 printers within Bluetooth range all called the TSP-100. The best solution here is to rename each printer to have a clear, differentiated identifier. To do that, download an iOS app called "TSP100III Utility". Once opened, first select your printer, then go into "Bluetooth settings" to rename your device.

