Moneris is a payment processor responsible for authorizing and processing debit and credit card transactions. This article will help stores connect their recently-received Moneris terminals to the BLAZE software - so that sales staff do not have to type in dollar values.
Important: Moneris does NOT currently integrate using BLAZE's WebPOS ( iPad / Android ONLY ). Your Moneris terminals must be connected to the internet and be fully functional as a standalone machine before proceeding with the BLAZE setup steps. If your Moneris terminal isn't working yet, please contact Moneris' 24/7 support line.
ALSO: Before operating please confirm with Moneris that refunds are enabled and that the refund limits set by Moneris suit your needs.
How To Get Started
At a high level, the steps to connect your Moneris terminals to BLAZE are as follows:
-
Connect your bank account with Moneris
-
Set up Moneris terminal hardware
-
Set up a static IP and semi-integration mode for your Moneris terminal
-
Connect your terminal settings to your BLAZE POS app
-
Test connection
For help on steps 1 and 2, please contact Moneris directly. For help on step 3, please contact your IT/networking professional, or Moneris for direct assistance. For steps 4 and onwards, please contact BLAZE support.
1. Connect your bank account with Moneris
Contact Moneris directly to get assistance. Click here to be directed to their contact page.
2. Set up Moneris terminal hardware
Contact Moneris directly to get assistance. Click here to be directed to their contact page.
Which payment terminals are supported by BLAZE?
BLAZE supports the following Moneris payment terminals:
-
ICT250 (LAN- legacy hardware, no longer shipped)

Moneris Core payment terminals:
-
Desk/5000 (LAN)
-
V400c (LAN)
-
Move/5000 (Wi-Fi)
-
V400m (Wi-Fi)
We currently do not support any of the Moneris GO terminals on our platform.
3. Set up a static IP and semi-integration mode
This step requires in-depth knowledge of IT and networking. Please contact your IT manager or professional before proceeding.
Click HERE for documentation that walks through the process.
4. Connect your terminals to BLAZE POS App
You can connect your terminals to BLAZE via the settings screen.
1. Go to your Settings > Payment Options.
2. Disable "Credit", "Debit" and "Merrco".
3. Enable "Moneris". Note: "Credit" and "Debit" refer to non-integrated payment methods, but since Moneris handles them both in an integrated manner these transactions will be capable.
Note: Other may be used if your store accepts e-transfers or cheques for example.
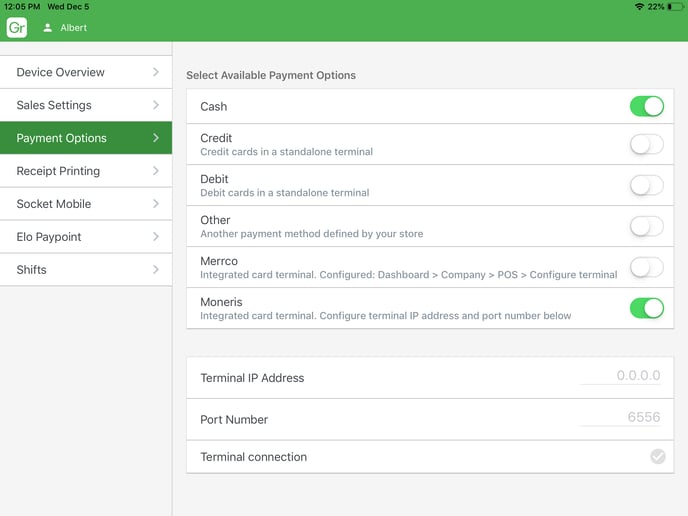
4. Once you enable "Moneris", select the correct terminal (Moneris Core or iCT250). The default model selected will be Moneris Core.
5. Moneris Core set up:
a. Config Code (Provided by Moneris) - will always be C000156SI by default.
b. IP Address (Use IP address from the network)
c. Port Number (Use the created 4-digit number or recommended 6556 from BLAZE) Note that Port Number needs to be 6556 both on BLAZE and the terminal.
Important: Set up a test sales transaction to check the connection for Moneris Core terminals.

6. iCT250 set up:
a. IP Address (Use IP address from the network)
b. Port Number (Use the created 4-digit number or recommended 6556 from BLAZE) Note that Port Number needs to be 6556 both on BLAZE and the terminal.
Once the Terminal IP address and Port number are configured, you will see the Terminal connection status to change to green.
For more information on finding your terminal IP address click HERE

5. Test connection
Now, let's make a test transaction!
-
Go back to your POS register page.
-
Select a product to be added to the cart. Note: product retail price should be greater than $0.
-
Click on "Charge" and select "Moneris".
-
Submit the dollar amount transaction.
On your respective Moneris terminal, the total dollar amount for the product should automatically show up on the device. From here, you can simply cancel the transaction, or go ahead with a deal with a real credit card.

What should I do if there is an error connecting to the terminal?
Check the following steps:
-
Ensure that your Terminal is online. The terminal should display a green ethernet icon on the screen.
-
A 'WELCOME/BONJOUR' message may appear on the main screen of the terminal. This means that the semi-integration mode is enabled.
-
It has been reported that some customers do not see this Welcome page so do not worry if you don't.
-
-
Ensure that your iPad / tablet is communicating to the right terminal, IP address and port number. You can check by checking the connection status icon on the 'Settings > Payment Options' screen.
-
If the problem persists, please contact us.
-
If the terminal can communicate with Moneris, you can change to 'Stand-alone mode' but pressing the downwards arrow (second from the left) will confirm stand-alone mode. Press the same button and confirm to switch back.
Helpful Tip:
Some Moneris terminals will come with a default delay when printing your receipt. Depending on which terminal you have you can change the settings following the below instructions:
To change the receipt settings in iCT250:-
Click the # button to open the main menu
-
CONFIGURATION > PRINTER CONFIG > PRINT DELAY (press green button to navigate to sub-menu)
-
Set to 1 and press the green button
-
(Press red button to return the default screen)
To change the receipt settings in Moneris Core:-
Tap Settings > Application > Receipt
-
Tap Print Delay field and set 0 seconds
-
Press the green button to save
-
Ensure that your Terminal is online. The terminal should display a green ethernet icon on the screen.
A 'WELCOME/BONJOUR' message may appear on the main screen of the terminal. This means that the semi-integration mode is enabled.
-
It has been reported that some customers do not see this Welcome page so do not worry if you don't.
Ensure that your iPad / tablet is communicating to the right terminal, IP address and port number. You can check by checking the connection status icon on the 'Settings > Payment Options' screen.
If the problem persists, please contact us.
If the terminal can communicate with Moneris, you can change to 'Stand-alone mode' but pressing the downwards arrow (second from the left) will confirm stand-alone mode. Press the same button and confirm to switch back.
Helpful Tip:
Some Moneris terminals will come with a default delay when printing your receipt. Depending on which terminal you have you can change the settings following the below instructions:
To change the receipt settings in iCT250:
-
Click the # button to open the main menu
-
CONFIGURATION > PRINTER CONFIG > PRINT DELAY (press green button to navigate to sub-menu)
-
Set to 1 and press the green button
-
(Press red button to return the default screen)
To change the receipt settings in Moneris Core:
-
Tap Settings > Application > Receipt
-
Tap Print Delay field and set 0 seconds
-
Press the green button to save